Project: Zed Shurikens (free 3d files)
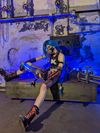

Project: Zed has always been a dream cosplay of mine. It brings so many challenges to solve and allows for so much engineering in the solutions. I was debating giving it a shot for my next project but decided against it in favor of another. I did, however, make the iconic shurikens. Seeing as I am really busy with other projects and IRL I thought I might as well give them away since I won't be using them any time soon.
Just want to download the files?
Creating the Shurikens
The shurikens are probably the easiest part of P:Zed so I was looking to tackle them first. Looking at references they have a very awesome and aggressive geometry.

I wanted the shurikens to be able to be removed from the back and handled. This presented a huge challenge as their internal volume is quite small and to be able to fit batteries + LEDs in such a small space proved to be difficult.

I started by taking reference materials and doing my best to create some 2d sketches of the shuriken profile. This also let me decide on the scale. Taking measurements against my own back I ended up with a staggering ~400mm from blade tip to blade tip.
Focusing on the blades first I worked on extruding out and whittling down the "blade frame" to fit the profile and contain an inner channel to house an LED strip. The plan was to have the actual blade slide into the channel as well to fit snugly and close to the LEDs. After measuring the LEDs I was using and creating the channel I added I lot more fine detailing to the frames themselves. To maximize the detail and to better fit the capabilities of my printer I split the frames in two. A top and a bottom. These top and bottom pieces join together with 3x M3 screws.


Creating the blade was a very unique challenge. The blade needs to diffuse the LED light in a way that makes the entire blade illuminate, even though the LEDs are concentrated in the base. I attempted to create an inlaid hex pattern to help break the light up as it travels up the blade. Since working on this project I have put a TON of time into making the perfect 3d printed LED light diffueser. There are a lot of improvements I could make to this blade design looking back on it now. One thing I would start with would be making the height of the hex patter deeper as you travel further from the LEDs. This would help catch more light as it travels upwards.

The blade was printed from transparent red PETG to allow a lot of light to pass through. This piece is very hard to print due to its size. The actual orientation I had to print it at was very odd.


Joining the middle connector to each blade is handled by 2x M3 screws around a window that allows for the LEDs in the blade to hook up to the power supply in the middle. The middle connector slots snugly in each of the 3 blades.

The front of the connector has a triangular red window also printed in transparent red PETG, so you can put LEDs in the center too if you want. This piece needs to be glued into place.

For easy access the back of the blade has a panel that is attached with 3x M3 screws. This allows for you to either fit a small battery pack inside or to connect through a plug to a battery pack in the main costume, or a wall plug to make it a decorative piece.
Finished Product


I am really happy with the finished product. This was a fun side project to do while working on my Kiwi and another Project skin from LoL that I am not ready to show off yet. Thanks for coming on this journey with me. I don't post much on Instagram, but a follow is always appreciated and that way you won't miss any cool stuff I am doing next.
Get the files
These files are provided under the Attribution-NonCommercial-ShareAlike 4.0 International License.
TL:DR - You can download, use and modify these files, however, you can NOT use them for making money, you can NOT sell them. If you modify them and provide the files after modifying, you must provide the files for free, with this same license.
Things you need to assemble
18x M3 screws
Some glue
3d printer
LED strips/power source (if you want to light it up)